The Sweet Secret Passed Down Through Generations
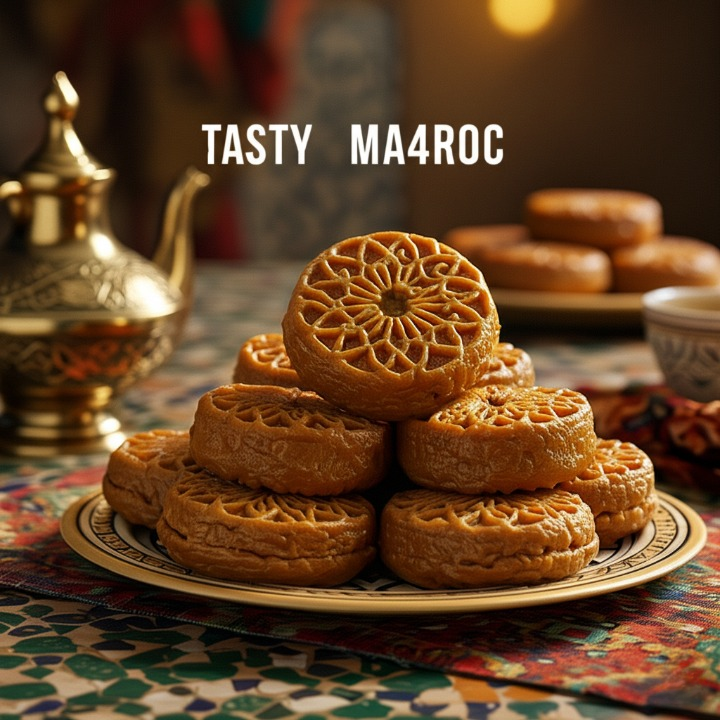
When I was a little boy, the arrival of Ramadan in our home in Marrakech didn’t truly feel real until the smell of frying chebakia filled the air. My grandmother would roll up her sleeves, tie her floral apron, and begin the ritual of preparing tray after tray of this golden, sesame-studded delight.
And there was always one thing she’d say:
“Chebakia has to be crunchy enough to make a sound, but soft enough to melt in your mouth.”
That contrast—crunchy outside, soft inside—is the very soul of a perfect Moroccan chebakia. But how is it achieved? What makes this pastry so uniquely textured?
Over the years, through trial, error, and watching the matriarchs of my family, I learned the real secrets. And in this article, I’ll share them with you—from the traditional dough preparation to frying techniques and honey tricks that make all the difference.
🌾 1. The Dough: Texture Starts with Balance
The dough is where most people go wrong. Too stiff, and it stays hard. Too soft, and it collapses in the oil.
🧺 Ingredients that Matter:
- Flour: Always sift it to keep the texture light. Use all-purpose, but some families mix in a bit of fine semolina for added bite.
- Ground almonds: They bring richness and softness inside.
- Anise & fennel seeds: Ground and fragrant—classic for aroma and warmth.
- Cinnamon & saffron: For depth and color.
- Orange blossom water: A touch of this gives the dough its signature Moroccan perfume.
- Vinegar or lemon juice: This small touch actually helps with the crunch.
- Butter: Melted, but cooled before adding. Too hot, and it ruins the dough.
After kneading, the dough must rest for at least 30 minutes, covered. This allows gluten to relax and gives the dough its flexible texture for shaping.
👩🍳 Tip from My Aunt Souad: “If your dough cracks while folding, it’s too dry. If it stretches too easily, it’s too soft. Add flour or orange blossom water to fix it.”
✋ 2. Shaping with Love (and Patience)
Shaping chebakia is like origami. You cut the dough into rectangles with slits, then fold the strips into that beautiful flower shape.
But here’s the trick I learned: don’t press the folds too tightly. If the folds are too compact, the inside won’t cook well and stays doughy. Leave a little room for the oil to reach inside each layer.
🍳 3. Frying: Temperature Is Everything
This is the most underestimated part. The oil temperature determines if your chebakia ends up greasy, soggy, or just right.
📌 Frying Tips:
- Use mild vegetable oil (sunflower or canola).
- Heat it to medium—not too high, not too low.
Use a wooden spoon: dip the handle. If bubbles form steadily (not too fast), the oil is ready. - Fry in batches, and don’t overcrowd the pan.
Each chebakia should puff slightly and turn a deep golden brown—not dark brown. This gives the crisp exterior without drying out the inside.
🍯 4. The Honey Dip: Warm and Light
Once fried, chebakia goes straight into warm honey (not boiling hot and not cold). Traditional honey is mixed with:
- A little orange blossom water
- A touch of melted butter or oil
Let each piece soak for at least 2–3 minutes, and stir gently so all sides get coated.
🧡 Family Trick: If the honey is too thick, the chebakia won’t absorb enough. If it’s too thin, it won’t stick. Warm it just enough so it runs like syrup but still coats the spoon.
🌬️ 5. The Final Touch: Cooling with Air, Not Fridge
After soaking in honey, chebakia is removed and placed on racks or parchment paper. But here’s the key: never seal it immediately in a container.
Let the air do its magic for a few hours. This helps the exterior crystallize and stay crispy, while the inside remains tender from the honey.
🧈 So… Why Is It Crunchy Outside and Soft Inside?
It’s a combination of:
- A balanced dough that can hold shape but tenderize when cooked.
- Proper oil temperature, ensuring quick crust formation.
- A warm honey bath that soaks just the right amount into the folds.
- And finally, cooling naturally, not rushing.
This contrast in texture is what makes chebakia so special. It’s why, even after weeks in a tin, it still has that satisfying snap when you bite—and then melts right into the honeyed softness you expect.
💬 My Own Lesson the Hard Way
The first time I tried making chebakia on my own, I was overconfident. I used cold honey, fried too fast, and stacked them in a plastic container while still warm. The next day? Soggy, chewy disaster.
My mother just laughed and said,
“You rushed it. Chebakia isn’t a quick dessert. It’s a story that takes time to tell.”
Now, I never make it without thinking of her—and I never seal them before they’ve aired.
🙋♀️ Moroccan Chebakia Is More Than Dessert
In Moroccan culture, chebakia isn’t just a sweet treat. It’s a symbol of Ramadan, a gesture of hospitality, a dish that says, “You’re home.”
During Ramadan, it’s served alongside harira, balancing the savory soup with sweetness. But honestly, in my house, chebakia is welcome at any time of year. My niece even takes it to school as a lunchbox treat!
📌 Final Tips Before You Try:
- Don’t skip the orange blossom water—it’s key to authentic flavor.
- Store in an airtight tin, lined with parchment. Avoid the fridge.
- If you like them extra crunchy, you can reheat them slightly in the oven at low temp before serving.
💭 What About You?
Have you ever tried making chebakia at home? Did it turn out crunchy and soft, or did something go wrong? I’d love to hear your experience—and if you have a family secret, don’t keep it to yourself 😉
Drop a comment below, or share your favorite way to enjoy chebakia. With tea? With harira? Midnight snack?